Return the Wolf

Vector illustration with outlines (new terrain for me!) showing a bird's eye view of a rural landscape with lots of forest that forms the head of a wolf (the ears are mountains, the eyes and nose are lakes etc). It's night with a moon, no cars but public transport (train and bus). Around it is written: „Return the wolf, let nature heal.“

This illustration is inspired by a #documentation on the benefits of returning #wolves to #Scotland, they could hold the deer (and sheep!?) population in check so natural forests could regrow! Just imagine the #highlands a huge forest!

Check out my portfolio for detail images and a process video.

Enjoyed this? Consider tipping me! ☕ ✨ https://ko-fi.com/jfml_jfml

#JfmlArt #art #illustration #creative #DigitalArt #FediArt #CreativeToots #ArtWithOpenSource #MastoArt #map #maps #wolf #animal #inkscape #vector #nature #environment

Avocados gegen Hass 💫

Illustration of (half) an avocado character on light pink background that is kicking a swastika to bits. Above it a 3d-text says „Avocados gegen Hass” (Avocados against hate).

Always wondered why it’s called „Hass Avocado“ (Hass meaning „hate“ in German, so „Medium Hate Avocado“ 🤔)* and since the whole western world seems to be turning fascist I decided Hass Avocados are actually not ok with all this bs.

Be like the Hass Avocado and stand up against hate!*

* I since learned that the surname of American who cultivated that variety of avocado was Hass:

https://en.wikipedia.org/wiki/Rudolph_Hass

#JfmlArt #art #illustration #creative #DigitalArt #FediArt #MastoArt #Inkscape #typography #design #avocado #NoAfd #AfdVerbot #Antifa #NoNazis #AntifaSticker #NieWiederIstJetzt #antifaschismus #FckAfd

How to work with Clip-Groups in Inkscape

It’s another „Write it down so I don’t have to search for it on the internet all the time“-post!

– Rightclick on the object that should be the outer form of the Clip-Group and select „Set Clip Group“ (located near the bottom of the list). In the Layers and Object panel (Ctrl-Shift-L) the object will have been put in a group (that has a tiny scissor icon on its lower right) that contains another group called „Clip“ that contains the object.
– Now either click the „Clip“ group icon in Layers and Objects or double-click the original object on the canvas to get into the same state and draw a new object inside the Clip Group.
– You can also paste / move objects in Layers & Objects into the group, they have to be above the „Clip“ group that contains the original object
– With the original object in the Clip group selected you can change it’s shape (n), size (s) etc.

Screenshot of Inkscape showing a roughly circular red object on the left with an orange circle inside it that is only party visible. The orange object is selected and the right image of the screenshot shows the object in the Objects & Layers panel being inside a clip group (of the red object) above a group called Clip that has the original red shape inside it.

Thanks to this video by yjarz on Youtube linked by Polygon in this (German) thread I made about this very topic in the Inkscape forums.

Inkscape: How to split / break one object in two

Since it’s the three-bazillionst time I’m looking this up I’ll write it down here so I can find it easily.

You split an object in two at certain nodes by selecting two nodes and then pressing:

Shift-B (Break apart at selected nodes) as pointed out on Stackexchange.
Ctrl-Shift-K (Break apart again but the path/object this time, I guess? This always confuses me to no end, why this is a two-step process? Only the almighty SVG goddess knows)

I’ll preserve the handy graphic that user Brecht (see link above) made in case Stackexchange goes full enshittify mode in the future:

Schreenshot of the menubar in Inkscape that has all the node buttons with red arrows pointing to their keyboard shortcuts: Join Selected Nodes : Shift + J Break Path at Selected Nodes: Shift + B Join Selected Endnodes with a New Segment: Alt + J Delete Segment Between Two Non-Endpoint Nodes: Alt + Del

Briefwechsel Michael Ende und Werner Zurfluh

Da ich grade nochmal panisch danach gesucht habe, hier der Link zu einem Briefwechsel zwischen Michael Ende und dem Klartraum-Forscher Werner Zurfluh (1945 – 2008):

https://oobe.ch/endebr.htm

Ist auch auf archive.org archiviert, insofern bleibt uns das wohl erhalten.

Ich weiß noch, dass ich das damals super faszinierend und traurig fand, dass Ende so unfassbar fantastische Geschichten schrieb, also Zugang zu solchen Welten hatte in den Briefen aber auf mich irgendwie verzweifelt wirkte in seinem Wunsch sowas auch erträumen zu können.

How to batch-convert videos with ffmpeg including all audio and subtitles

Since I spend quite a bit of time tinkering with this I though it might be interesting to others.

The following can be executed on a folder with a bunch of videos which ffmpeg will convert including all audio and subtitle streams and put in a subfolder (not very) originally called „Done“ (not sure if you need to create that folder or if ffmpeg will do that*):

for i in *.*; do ffmpeg -hwaccel_output_format cuda -i "$i" -map 0:v:0 -map 0:a? -map 0:s? -c:v hevc_nvenc -b:v 2000k -preset slow -c:a aac -b:a 128k -c:s copy "Done/${i%.*}.mkv"; done

All the for i in for the batch-conversion is way above my tiny „I can’t learn programming“ brain and is taken from this StackExchange thread (among other things I can’t find now). You could do *.mp4 or *.mkv if you only want those types of videos to be converted.

-hwaccel_output_format cuda and -c:v hevc_nvenc? tells ffmpeg to use the GPU with Cuda (so will probably only work with NVIDIA) and use HEVC (x265) as the video-codec.

The interesting bits are -map 0:v:0 -map 0:a? -map 0:s? which selects all video(?), audio streams and subtitles. I was using -map 0 before but this sometimes created empty video or audio streams which caused all video players I tried to crash (except for good old VLC who did not care). Not ideal.

-c:v and -c:a select the audio and video codecs (c = codec) with slow preset in this case, whereas

-b:v and -b:a tells ffmpeg the bitrate (b = bitrate).

-c:s copy copies the subtitles.

* Edit: You do need to have a folder withe name you specify there in the folder where you run the script. If someone knows how to automate that I’d be happy to hear how ^__^

How to import PDFs as „images“ in Scribus

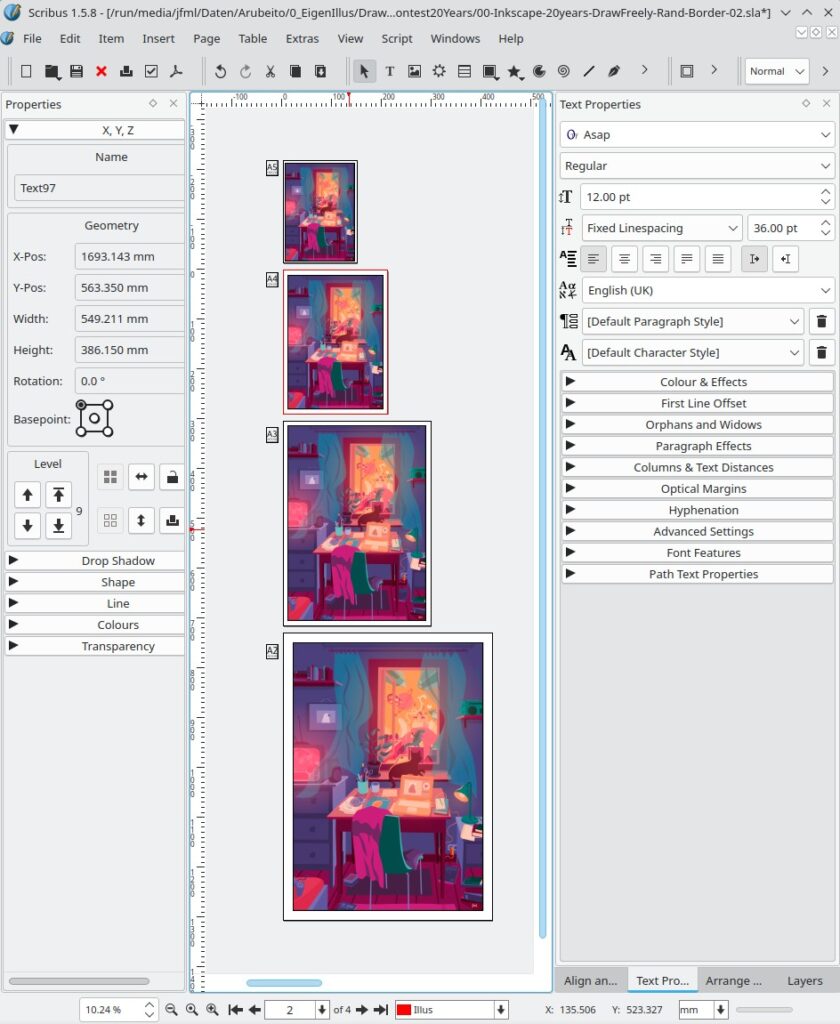
Since I had to figure this out multiple times now (because I always forget how to do it +___+), here’s a workflow that seems to be working for me to add white frames of different widths to different sized pages to vector illustrations – my local printer The Art of Print (which is amazing ^__^) here in Edinburgh wants it that way.

I need page sizes ranging from A5 to A2, including borders between 5 mm and 2 cm.

Screenshot of Scribus showing the same illustration on different sized pages.

Yesterday I figured out that it should be possible to do this in Inkscape with clones but there seems to be a bug that just exports nothing instead of clones on a new page (and cloning a whole illustration is no fun because you need to put it all in one top layer with sublayers).

After a lot of fiddling I remembered that in Scribus you can actually import PDFs (but not SVGs, apparently) as images into image frames (ctrl-i or rightclick > Content > Get Image) if you change the „Files of Type“(?) to „All supported formats“.

This imports the vector graphic as an image (not what we want at all!) but unlike File > Import > Get Vector file which imports (or rather appends, inserts) the PDF or SVG as editable objects this cuts the image at the original page border (yay).

You can then arrange the PDF / image just as you need on pages and when exporting it to a PDF for printing you can check the box on the PDF export dialogue in General > File Options > Embed PDF & EPS files (EXPERIMENTAL!) to export the PDF „image“ as vectors. This has always worked well for me so far.

Scribus PDF-export dialogue with the Embed PDF-Files option highlighted

Thanks to Raghavendra Kamath for pointing out this last trick out to me, otherwise this whole process would be useless ^__^

Now I just need to remember how to do this when I need it again in a few months …

„Fixing“(?) Duplicati MissingRemoteHash error

I recently got a few errors like this:

2023-11-30 23:46:34 +00 - [Warning-Duplicati.Library.Main.Operation.FilelistProcessor-MissingRemoteHash]: remote file duplicati-[stringofnumbersandletters].dblock.zip is listed as Verified with size 0 but should be 52383505, please verify the sha256 hash "[anotherstringofnumbersandletters]"

rebuild-missing-dblock-files and no-local-blocks (saw that on the Duplicati forum) didn’t work, so I copied the files Duplicati was complaining about somewhere else and deleted the originals.

I then deleted and recreated the database via the Web-GUI (got errors that said files where missing and registered as such 😱), ran backup again, no warnings or errors, anymore. Profit?

There’s a lingering doubt that the files are just gone and not recreated but at least there are no more errors +__+

How to fix hyphenation not working for Scribus on Fedora Linux

I just found out how to fix #hyphenation not working in #Scribus on #Fedora (probably for #languages that aren’t system language):

Check that the text frame (Windows > Content Properties), character and paragraph styles (Edit > Styles, maybe you need to double click on a style to edit) are all the correct language (in my case German on an English system).

If Extras > Hyphenate Text still isn’t working, go to Windows > Resources > Hyphenation Dictionaries and check that you have the correct .dics installed (for me it was only English) and download the appropriate ones if necessary. You can also see the path where they are installed on the system here, so you could manually move a .dic there if you manage to find one.

Tadaa 🎉

EDIT: Writing this down has already helped my once, amazing! You might need to restart Scribus after all these steps before it starts working, at least that’s how it was for me just now.